DIY: Clay keychains + Storm Dishes
I started out thinking that this enlightening article was solely likely to function as DIY for clay key chains, yet, once I left them began to uncertainty them as the very first baked clay primary series I broke. You always hear that the horror stories of folks trying to re create recipes or DIY's they watched P interest, only to earn some thing that looks like the pretty graphics they observed P-interest. Fortunately, that has never happened to me personally, but I honestly begun believing that this would be it, also this explains the main reason I immediately found yet another tool for your clay I had purchased. Ultimately, the crucial chains wound up amazing and that also I generated a 2nd fantastic job to converse to you personally! I ascertained that the do's and don't to most of those endeavors, but trust me they have been quite straightforward and you ought to pat your self on the trunk to each of your work.
I photographed the incremental process because of its clay keychain s [ originally created by Homey! My that has a fantastic guide with regard ], but had been in just a small amount of a rush which makes the gold-rimmed clay jewelry dishes considering the fact why these were Christmas gift ideas, so keep with me on the written writing guidelines. Promise they make complete awareness! Disclaimer, while these two DIY's are not excessively hard, they're a slightly time-intensive because it's necessary to wait what to dry or cool. The jewelry dishes, as an instance, were over three days. One day daily to bake, polishpaint. Additionally, you could easily get addicted to clay projects.
DIY MONOGRAM CLAY Keychains
Provides:
Inch. Clay [ in anything colour of your choice ]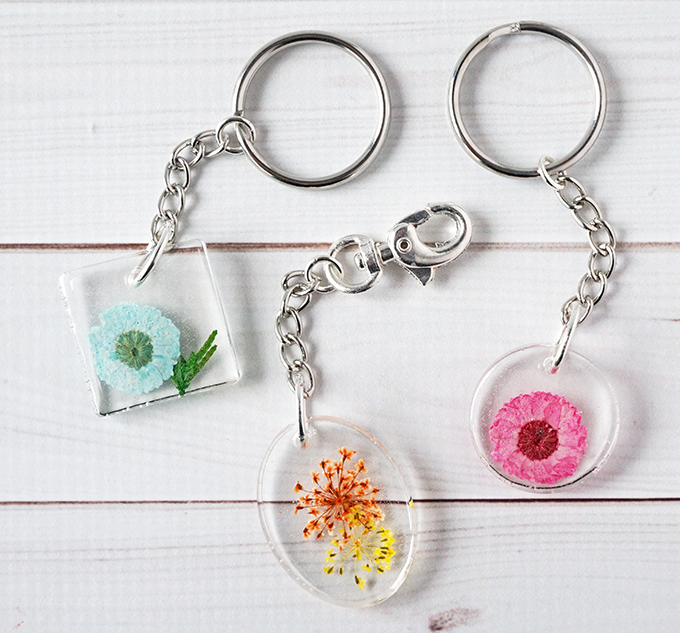
2. Rolling-pin
3. Parchment Paper
4. Clay Cutters
5. Clay Embossing Kit
6. Toothpick
7. Jump Rings
8. Keyrings
9. Two Needle-Nose Pliers
Guidelines:
Cover cutting board with parchment paper. It's bad to make use of something you're likely to be using food later.
Use a rolling pin flatten chunk to approximately 1/4 inch.
Cut the shape you'd enjoy from the clay, and subsequently removing any additional chlorine.
Emboss clay together with letters/symbols of a person's selection. I used to not make use of stamping devices included of the clay embossing kit. I ran across that the letters to become much apart and picked to get eyeballing it alternatively.
Using a toothpick, poke a hole near the surface of the shape, bookkeeping for just the way big your jump rings are all. Be aware I snapped the gap just a bit too much away by the boundary and had to acquire large jump rings to include the exact length.
Cut the parchment paper around the clay and then move to your baking sheet. I mightn't advise attempting to pare off the clay the newspaper and shifting with your palms. There are so many methods in which you can ruin it, view in me.
Bake for 40 at 230� F or F is hardened stick with the instructions on the clay packaging. I feel this might be the key reason why I broke a few bits. Cannot over-bake.
After mist has chilled, then bend a hop ring and then slip through the pit . Before closing the jump ring, then slip yet another.
Slide 2nd hop ring onto an integral ring and sew!
I really wished to generate organic looking clay jewelry trays that I did not comply with a few specific tutorial. I've noticed a whole lot in stores and online hence I'd a thought of exactly every thing I needed to prove like.
Provides:
Inch. White clay [ I enjoy sculpey]
2. Rolling-pin
3. Parchment Paper
4.
5. Small Amount Paint Brush
6. Gloss Glaze
7. Paper-plate
Strategies:
Part off about a great total of clay, roughly 3x as much as you possibly want a key chain. This could require several tries to work through how far you require. Plus, the varies based on what size this dish you're making.
Roll clay to perfect of a chunk you can.
Use a rolling pin evenly flatten the clay on parchment paper. It has to be very curved if wrapped evenly to just only a little over 1/4" thick.
Utilize your palms shape clay into a dish form. This ought to seem organic and not-perfect. Obtain the sides equally as large as thick as you want.
Bake in accord with this specific clay packaging.
Twist a dollop of golden paint onto the paper plate. Utilize small flat paint brush paint the bottom of the dish. Again, it will not require to become flawless.
After dryingpaint the gloss onto complete the restroom. Allow drying thoroughly.
Hope you have some terrific time using fun clay equally so much as I did so. It'd been only such as reverting in to play doh days but finding quite a end product.